Okay, so FINALLY I have finished the latest indie project for Swell Sisters. It stumped me, have to admit. It was so cool already, really just wasn't sure where to take it. I like how it turned out. Below, I will show you a little of how I did it if anybody is interested. It involves a gel transfer technique that is VERY cool to do, and has so many possibilities! I want to try and dabble in this more, so don't be surprised if you see it again! I encourage you to try it as well.

Step 1: You need a good gel medium. This is my personal favorite.
I think also Modge Podge or any other decoupage medium would work as well,

Step 2:
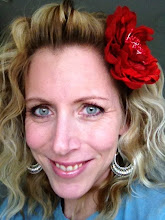
Get your image. I found this on a free vintage site, I took it into Photoshop, desaturated it, and upped the levels so that I had a crisp, black and white, blown-out image. Note: be careful about thinking through the positioning of the image. It will be the mirror equivalent. I forgot about this for this artwork, and originally was eyeballing it to go on the canvas just as you see it. But when I flipped it over, I said "duh" to myself several times. Luckily this mistake didn't cost me too much because it still worked for the over all piece.
And this is THE MOST IMPORTANT PART OF ALL: Have your image copied at a copy store with a TONER based copier. You can also get a color copy done as well and it will work. Unfortunately, ink based printers (like the ones we all have at home) don't work!

Step 3:
For this particular artwork, I knew that the woman's image would be "invisible" on the white parts of her skin, so I painted in a white and turquoise backdrop for her face, and let that dry thoroughly. 
Step 4: Apply a liberal amount of gel medium on the front part of her face, as well as on the canvas. Lay the paper down on the area of the canvas you want it to be. Gently smooth with finger from middle to outsides to try to release any air bubbles. Do NOT apply gel medium on back side! Let dry completely.
Step 4: When the image is finished drying completely, (sorry I don't have pictures of the process itself) wet the back of the image thoroughly and begin to rub all of the paper off with your finger. It is very tedious, and your finger will get sore--but it is worth it! What you will have when finished is just the ink from the toner imbedded in the clear gel medium!
When done, put a final coat of gel medium over everything to even things out.
(Ugh--sorry folks--have NO clue why in the world this last paragraph is underlined! NOTHING I do fixes it! UGHHHHHH!!!)

 This room is so appropriate for the lovely Spring that is now upon us! For this little girl, it will always be spring in her room. Maybe we need to paint flowers in the living areas of our homes to keep us feeling cheery?


